Any time of the year is a good time to have plenty of tread, but in winter never a truer word was said. Tyres and that all-important grip provided mean the difference between getting somewhere or not. One of the great conundrums of 4WD ownership is what’s right in tread design?
Most regular readers of the pages we write either here or in our social media offerings will know of our preference for “LT” or light-truck construction 4WD tyres because their durability and better steerability over standard “P” passenger car rubber sometimes referred to as “H/T” or highway-terrain. Here in South Australia we reckon that LT construction coupled to an “A/T” all-terrain pattern will usually be the best bet. In South Aussie we usually don’t suffer ridiculously muddy tracks, so the benefit of an “M/T” mud-terrain pattern will be largely lost.
In other parts of the country however the muddie might be of benefit, especially in places like the Victorian High Country, where water and hills go hand-in-hand.
Looking at all three patterns it’s pretty easy to see what the design-spec was. The H/T with its regular tread pattern, shallow tread depth (9mm) and narrow tread channels and sipes is clearly keeping an eye on the bitumen. Once it’s exposed to mud it’ll quickly choke and offer zero grip.
The A/T is better placed. With a more aggressive tread pattern with deeper channels (13mm), it’ll swallow and spit out all but the gooiest mud and retain some degree of mobility.
The M/T is really a specialist pattern, big tread blocks with massive voids and deeper channels (13-15mm) get down and bite in the slipperiest, providing important traction when the going is tough.
In terms of road noise the H/T wins hands-down, usually quiet as a mouse, the A/T will be marginally rowdier and the M/T plainly obvious both in and out of the vehicle.
Tyre makers have gone to great lengths in recent years to make noise a thing of the past. Looking at the tread shapes of the latest Bridgestone D697 A/T or their equivalent M/T the D674, or even the Toyo OPA/T 2, their A/T pattern and their OPM/T muddie, the tread blocks are shaped and aligned to ruffle the flow of air through the tread face and create a quieter tyre.
|

Bridgestone D697
|

Bridgestone D674
|
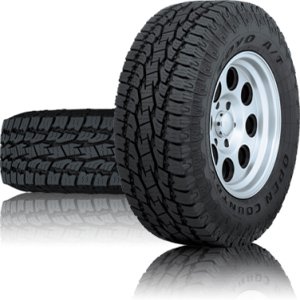
Toyo OPA/T
|

Toyo OPM/T |
The other issue with M/Ts in the past was wet weather bitumen grip. Having a 2.5 tonne vehicle sitting on big aggressive tread blocks and chucked into a wet corner used to provide some fairly exciting times. Not so now, the more uniform and interlocking patterns afford much greater safety levels than before. They’re not perfect, but as a compromise tyre for tackling difficult trails in wet conditions as well as a run to work or the shops, a modern M/T can work.
No matter what tyre you select make sure it comes with an improvement in “Load Index”. Load Index is the only true barometer for tyre strength and if you can get a 120 loading or greater, you’ve gone a long way to making yourself puncture-proof. You’ll find that mysterious number on the sidewall, seen here in red LT265/75R16 123R. Here’s a link to a site that lists the Load Index amongst other useful information about tyre design http://en.wikipedia.org/wiki/Tire_code
continue reading...
There’ll likely be more than one time in the driving career of the average driver when they have to use a jack. It might be to replace a flat tyre or to service a vehicle. In either event it pays to be safe. Just recently the State Attorney General John Rau put out a reminder of the dangers of jacks after the crush death of a South Australian man in suburban Adelaide. He said “Under no circumstances should anyone work under a vehicle supported only by a jack”. He went on “Since 2000 there have been 46 fatalities of Australians who have been crushed while working under a vehicle supported by a jack z4root apk latest version download“. That’s a shocking statistic but it doesn’t also include those injured.
With a 4WD and using a 4WD as it was intended the risks posed to us are even more perilous. Firstly consider the mass of the vehicle, with the average wagon or ute tipping the scales at around 2 tonnes plus. Add that to the terrain you might be on when trying to correct an issue and the danger is omnipresent. So what can you do to prevent the risk of injury or death?
Jack selection is pretty critical. The standard jack that comes with a vehicle I think is better than most people will give it credit for, it’s far from perfect but it’s a good start. Provided the vehicle hasn’t been grossly over-accessorised and therefore become heavy to the point of being over-GVM, a standard jack will work in a variety of situations and enhanced with some simple accessories. Let’s look at some typical jacks that might be of interest and how they might perform in the field.
Hi-Lift or Kangaroo Style Jack – This used to be a mainstay of many a commercial vehicle fleet but today I reckon they’re useless. Not only are they incredibly dangerous to operate, but they’re also heavy and large, so finding a safe place to store them is difficult. A Hi-Lift has a lifting stem around 1200mm high with a lifting tongue activated by stroking a long tubular handle that “walks” its way up the stem with a mechanical pin action. There’s both a forward and reverse gear. The base plate and the stem are not fixed but rather floating (albeit secured with a split pin so they can’t come adrift), to allow the angle of the jack to change as the vehicle is raised and also to compensate for uneven ground it’s sited on. This creates an instability once the vehicle’s wheels leave the ground and make the process highly dangerous. Designed back in the 1950’s when vehicles had square bumpers made of steel, the Hi-Lift is about as useful as “tits on a bull” on a modern 4WD with plastic aero-shaped bumpers. Sure some will argue that a vehicle with a steel bullbar will likely have Hi-Lift slots installed to facilitate its use, but the danger is still there of the vehicle falling awkwardly off the jack. The other point worth mentioning too is that a Hi-Lift needs a mighty effort from its operator. Whilst the lever action provides a mechanical advantage in gearing terms to overcome the mass of the vehicle you’re lifting, you better make sure that you weigh at least 80kgs and be 180cm tall or more once the wheels come off the ground, because the effort required to use the jack is extraordinary. I’ve seen folks of slight stature left dangling from an elevated handle unable to complete the arc of the handle because they can’t get any leverage. They deserve to be consigned to the scrapheap of history.
Bullbag or Exhaust Jack – I was once a firm advocate of these jacks, an inflatable vinyl bag that you position under a vehicle to do the lifting. It works by holding a rubber cone on the hose end of the jack hard up against the exhaust tip of your vehicle. As the exhaust gases flow into the bag it slowly rises like a scone in an oven lifting the vehicle to the chosen height. Its best terrain for operation was either sand or mud, where the broad surface area of the bag spread the weight of the vehicle more effectively than a standard bottle jack with a tiny footprint that might simply disappear into the mire. A bullbag is really a 2 person operation, a person holding the cone on the exhaust and another sitting inside the vehicle keeping the engine speed at a fast idle. Now the real kicker with a bullbag today is that they largely won’t work on a modern vehicle and especially a diesel. Modern diesels run very sophisticated engine management systems and they work by monitoring engine diagnostics. The back pressure the bag creates in the vehicle’s exhaust pipe, once the bag fills to the point of lifting the vehicle, will likely be enough to trick the engine management system into thinking there’s a fault and it’ll likely stall the motor to prevent perceived engine stress or failure. So just at the critical point where the vehicle is about to be raised the jack stops working. If you had a pre-common-rail motor you might be able to use a bullbag, but when you do make sure the bag is protected from any sharp objects either on the ground or under the vehicle (bolts/screws/sharp edges). I used to use a couple of pieces of carpet to offer the bag a bit more protection than the flimsy vinyl patches it came with.
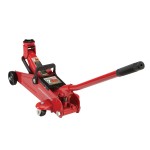
Trolley Jack – This style of jack is really one best suited to a workshop environment. In that environment they are really, really good. The jack employs a scissor action to do the lift, the jack’s base is on wheels (so its perfect on concrete to manouevre), a hydraulic pump lifts the locating plate with an easy stroke on the long handle. There’s plenty of different sizes to accommodate different weights of vehicles. I have seen some of our clients use them in the field and whilst not ideal on imperfect surfaces they can be made to work with a bit of leveling.
OEM Service Jack or Bottle Jack – The OEM (Original Equipment Manufacturer) bottle jack that came with the vehicle is useful because of its compact size. You’ll be able to locate it under the vehicle in a variety of positions (observe the illustration on the jack body or refer to the owners manual for location points). It’ll either have a wind-up action or lever-stroke to operate. When you do the lift you’ll notice there’ll likely be around 3 stages, as the stem extends, then extends and extends again to achieve its maximum service height. Used in conjunction with a sturdy base (a piece of timber or steel say around 300mm square), it’ll do what most people need in relative safety. Just watch out for the small locating plate/head at the top of the stem and make sure when you bring it in contact with the vehicle that it lifts running straight and true. I often will take a second bottle jack when I’m traveling so I’ve got 2 to use in tandem if need be to complete a chore.
Whatever jack you are using the simple message is to make sure that the ground you are operating on is preferably flat and firm and that you keep yourself out of the way if the vehicle falls off the jack. If you must get under the vehicle only do so if the vehicle is supported by stands and even then make sure the job is secure!!!
From Left: Bottle Jack, Exhaust Jack, Trolley Jack and Hi-Lift Jack
continue reading...
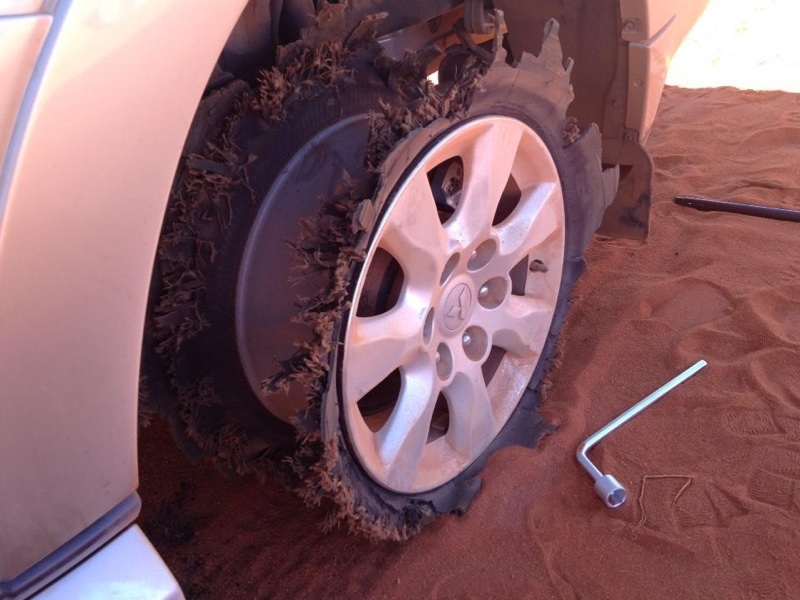
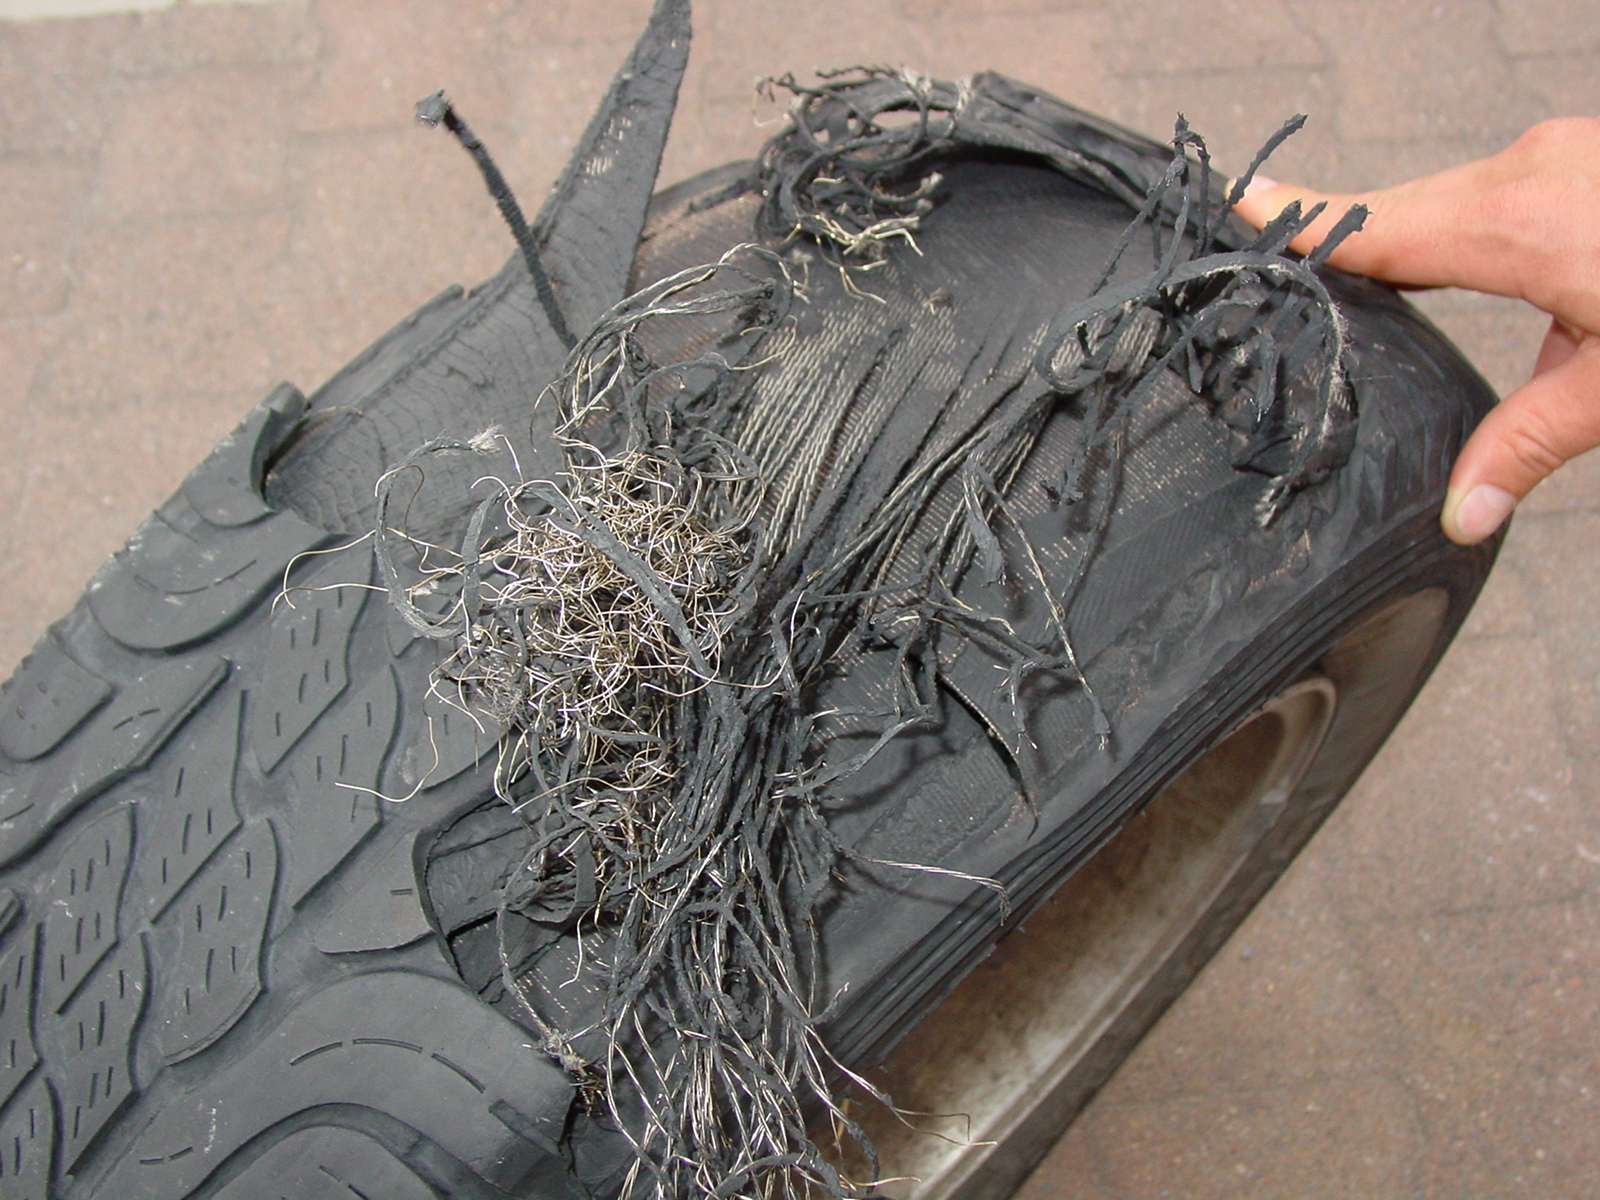
Tyres are a really important aspect of our business. A lot of our training revolves around it because it is after all, the one and only contact patch between you and the road. The other issue is that they’re also expensive, so a little TLC is in order to maximise the return on your hard-earned. There’s a couple of illustrations below of tyre destruction (see pics), one a run-flat resulting in a super-heated sidewall exploding and the other a spectacular delamination, where the whole tread face has separated from the carcasse.
Now to the cause. In the case of the run-flat it can usually be explained away via the old over-inflation saga. The tyre is a standard fitment Yokohama Geolander “P” or Passenger car tyre. Now when a vehicle maker asks a tyre supplier to sell them thousands of tyres over a period of a vehicle’s lifetime they want a tyre that suits the bulk of the likely buying audience and unfortunately these days 90% of the 4WD buying public have no intention of going bush. So a tyre is selected for its on-road bitumen manners around town rather than its off-road potential. That means a 9mm tread depth, a higher speed rating and a lower load index, the perfect recipe for the blacktop. This same tyre in this case has been asked to drive in the north of South Australia in the APY Lands, where the bitumen is just about non-existent.
An inexperienced driver probably has no concept of what a tyre placard might be or what it means. You need to seek it out, the silver or white sticker by the driver’s door pillar or on your glovebox lid. It’ll state (depending on vehicle) the axle load limits, tyre size, wheel size, pressure front and rear and maybe more about load index selection. Some of the info re tyre size will look like this:
265/65R17 112 H = 265mm wide, 65% of tread width becomes the height of the sidewall, R = radial, 17″ diameter wheel with a 112 load index = 1,120kg carrying capacity and H = 210kph speed rating
The pressure recommendations stump a lot of people because in this case the placard says the tyres should only be inflated to 210kPa = 29psi. Many people would look at that and think it way under-inflated, but the truth is it’s right for that type of construction. Now here comes the tricky bit. Run that tyre at 210kPa or more on a gravel road for any length of time and you’ll get a puncture, especially if you drive too quick on a less than perfect surface. With a tight tyre of flimsy construction, driven at high speed (typically 100-120kph), a passenger car 4WD tyre will fail. No contest.
In here we’ve always recommended a 20% reduction in pressure (from placard recommendation) accompanied by a 20% reduction in speed (that’s no faster than 80kph) and it works wonders. We can’t guarantee it’ll work every time, but it will improve your chances considerably. A better bet though is replacing the tyres with “LT” or Light Truck construction. Combine those recommendations and you’ll likely make yourself puncture-proof.
In the case of this tyre it was over-inflated, we’d hazard a guess around 250kPa = 36psi or more, driven over gravels at 100kph to the point where a sharp gravel has penetrated the carcasse and started a slow leak. Now the beauty with tubeless tyres is that rather an immediate full loss of pressure and loss of control (that’s why split rims and tubes are crap), tubeless go down gradually, giving you time to react and an astute driver will recognise the tell-tale signs that the vehicle is now handling at less than what it was prior to puncture. Bring the vehicle to a gentle halt in that initial period and you’ll likely have a tyre that’s repairable. That wasn’t the case here, the vehicle was driven and driven and driven, losing air pressure with every kilometre until bang, the super-heated sidewalls explode, leaving the result you see below. Luckily the rim didn’t hit the deck because if it had it too would have been ruined.
The second illustration showing delamination is usually the result of a big impact and likely around town. We wouldn’t mind betting the sidewall got clobbered against a kerb and the internal forces sheared a section of tread from its carcasse and the process of unravelling commenced. The final act was likely at speed, the air in the pocket of separation gets hot, becomes bigger and bigger resembling a hernia. By this stage there should have been a pronounced shimmy in that wheel alerting the driver to a major failure about to occur, and then bang! In this case the tread face has fallen off tearing the bond between layers of rubber and canvas and steel belts and leaving a rats-nest of strands all tangled up. The tyre is toast.
So the message is pay attention to the condition of your tyres, look at tread depth, look for anything unusual like cuts, bulges and check your pressures… REGULARLY!
continue reading...
Just last week I was in Port Augusta delivering some training to SA Government. Leaving my accommodation on Friday morning I noted a 150 Prado parked alongside me and I had a quick look at its fitout. It struck me that it was unnecessarily burdened with too many spares (wheels).
Now being prepared is a good thing when you’re going bush. The last thing you’d want is to have some omission rear its ugly head and cause a hiccup in your schedule, for when you’re out there earning your keep, productivity is King. But the flipside of this is going out there with too much, and too much of the wrong stuff. If you have a look at the pic below you’ll see what I’m referring to, a vehicle that has three spares.
Now the agency running this vehicle has had no doubt a run of trouble with tyres running out of air in the most inconvenient of places, so they’re now working on the Best Survey Removerlaw of averages that if you take enough replacements with you, you’ll have all bases covered. But at what cost?
I did a quick calculation in my head on the dollar value of the questionable components seen on the vehicle. The twin-spare wheel carrier retails for around $3,800, the roof-rack around a $1,000, two additional spare alloy wheels and tyres add another $2,000. That totals $6,800. That’s a LOT of money but what has it achieved? Well its probably satisfied some safety audit, but an audit based on ill-informed presumptions. From our experience having all that mass sited behind the rear axle is likely to INCREASE the risk of a loss of control via an oversteer moment which can lead to a similarly INCREASED rollover potential enhanced courtesy of the roof rack. The other bogey is the same rubbish Dunlop Grandtreks (Passenger car construction tyres designed for bitumen rather than dirt) are seen on each wheel, so the puncture risk (the reason all this effort has occured) is exactly as bad as it was before.
It is possible to be puncture-proof. With the selection of appropriate Light-Truck tyres with a significant increase in Load Index (the true barometer of tyre strength) and a vigilant attention to detail on pressures, punctures can be a thing of the past. I’d much rather spend $1,500 when the vehicle was new and fit it out with five replacement Light-Truck A/T (all-terrain) tyres like Bridgestone’s D697 and armed with a decent compressor for another $350 and a decent gauge for $30, have a kit that was working on the premise that prevention is better than the cure, rather than what I witnessed, which was more like throwing cure after cure at the situation and never really fixing the problem.
With the right tyres all that matters is monitoring pressures. Starting with the placarded pressures on the vehicle (which on a Prado are as little as 210kPa = 30psi) and employing a 20% reduction in speed once you hit the dirt (170kPa = 24psi) and SLOWING down by the same margin (i.e. no faster than 80kph) the tyre will now have the flexibility to absorb the impact much better, provide a much more comfortable ride and pull up in shorter distances should you need to stop in a hurry. So there’s plenty of positives for running up and down any of the major SA outback tracks. When the conditions change and the requirement is for more serious off-highway travel the rules change some, with sand and/or mud likely requiring an up to 50% reduction to maintain mobility (accompanied by a now maximum speed of 40kph).
The intent with the fit-out of this vehicle was good, the safety of its operators is hugely important, but the result was overkill and problematic. It’s better to seek out simpler solutions that are less weighty and expensive! If you’re running a vehicle fleet and would like independent advice on vehicle fit-out give us a call, we’ve likely encountered your requirement and/or need in the past and can quickly offer a solution (plus we don’t sell accessories so we won’t be making recommendations based on what we think we can load your vehicle up with).
PS If the tyres were swapped out when the car was brand new there was likely a credit on offer for the original Japalops of around $500, making the move to the stronger A/Ts even more attractive.

continue reading...
We do a lot of ATV training in this business and we’re always keen to pursue and promote the safest means of transport when using an ATV. There’s been on average over the last few years around 15-22 people dying in Australia whilst using an ATV and it’s a statistic that frankly is way-too-high and as a nation we should be ashamed of. In response Australian legislators have reacted and have been pushing the notion of retro-fitment of rollover protection systems (ROPS) to bikes already in circulation and encouraging bike makers to fit them as new and original equipment at the point of sale. The bike industry have reacted to the recommendations by commissioning their own research which is pretty damning to the pro-ROPS community. There’s a 15 minute video on the ATVSafety.com.au website that shows the research and the conclusions they’ve drawn and if you have an interest in this you should watch it.
We’ve been worried since Safe Work Australia made it a hotter potato than it already was with their ringing endorsement of ROPs. Personally we think they’re going about it the wrong way.
The overwhelming majority of ATV deaths and injuries happen on farms. We know the reason why because we see it all the time… complacency. It’s not good enough to jump on a machine under-prepared or under-dressed. When you throw caution to the wind something will go wrong. Might not be today, but next week, next month… There’s a host of other reasons why and we’ve identified a few below.
With all other vehicles we use on roads and tracks we make enforceable mandatory recommendations on driver/rider safety, yet for some reason ATVs aren’t caught up in that net. It’s simply not good enough that Government propose a solution that gives them a quick-fix and makes the issue go away (until the next person dies), when a better way exists in changing the minset and practice of the rider. Here’s our take on what needs to change:
- Make helmet usage compulsory – as the FCAI say in their campaign “Wear It or Park It”. And a further point. An open-face helmet isn’t safe. You should be wearing a full-face MX style lid of an Australian Standard approved construction, so we can put a lid on brain injury AND facial damage including soft tissue reconstruction and dental reconstruction.
- Complete the picture with proper PPE – the helmet’s the biggie but it needs to be supplemented with gloves, long sleeves or jacket, long pants, leather boots as any exposed skin will be torn to shreds. We’d even go so far as to recommend back protectors if you’re really serious about protecting yourself.
- No training – no ride! – rider training can make a massive difference. In other industries the practice of chucking a set of keys to a new driver and sending them on their way with no experience or understanding is long gone. Why is it OK to put a new rider with no prior knowledge on an ATV then? You might argue what could go wrong, it’s being used at slow speed and the risk is low? There’s plenty of risk and without being shown appropriate start-up procedures, loading and unloading, braking, steering, shifting body mass, ascending, descending and decommission, you’ll likely hurt yourself. Training fixes the majority of potential disasters in as little as a day’s worth of instruction. It’s cheap insurance.
- Is your ATV trackworthy – riding a bike that’s crook is just dumb. Time after time we see bikes with tyre pressures set wholly wrong. This is the single most important component to get right in the stability stakes. Using a regular tyre pressure gauge will give you the wrong result. Only a LOW pressure gauge will allow you to accurately measure the low pressures that flotation ATV tyres demand, as little as 25Kpa (3.6psi) on average depending on machine and weight/payload. Whilst we’re on tyres what condition are they in? Bald tyres are scrap, so too are tyres that have deep cuts, or have been repeatedly plugged with temporary repairs, spend the money and keep rubber on the machine that has some grip and in serviceable condition. Crook chassis, suspension and brakes only add to the drama.
- Underage riding is a no-no – clearly stamped on the guard of any ATV is a warning that only riders over 16 years of age are permitted and only then whilst wearing a helmet. If you’re in the habit of “dinking” a passenger you’ve failed too for it’s only possible on bikes that are “twins”, having a seat and wheelbase to accommodate it.
- Riding whilst pissed is a no-no – any acohol intake will render some degree of impairment and you simply can’t afford anything getting in the way whilst you’re in control of an ATV. Same can also be said of being dehydrated on a hot day. Not keeping the water intake up will result in a similar impairment.
- Riding too big a bike isn’t smart either – BIG is always BETTER! Not with an ATV. For the most part a mid-size ATV will do most jobs more than satisfactorily. An engine-size of 350-500cc will deliver on most occasions (modern EFI engines have tonnes of grunt) for the workplace, the only time a 600+cc machine might be required is for a towing application. Smaller machines weigh less too and are less likey to cause the early-onset of rider fatigue. EPS (electric power steering) models help in the fatigue stakes by a huge margin.
- 2WD ATVs are a waste of space – a 2WD ATV might be an enticing proposition on paper, but in the field they’re dangerous! A 4WD bike comes with double the grip and some will offer enhanced 4WD capability in the form of axle diff-locks for greater mobility. A 4WD ATV will outhandle, outbrake, outclimb, outdescend a 2WD bike every time.
- Pick your day – riding in the pouring rain or on a 40C day is asking for trouble. When the elements are against you go find something else to do!
- Consider a side-by-side – a traditional ATV is a marvellous invention affording incredible mobility, but there’s limits to what it can do and carry. For trickier jobs with heavier payloads you should be using a side-by-side (guess what, that’ll come with ROPS and seatbelts because it’s designed to).


continue reading...